
We saw loads of issues this past week with Feedburner, Google PR and angry midgets. What can I say except we made it through and our stats are looking better than ever. Except for some heavily dinged knee caps we came out ahead! And now here are some of our top stories you might have missed… And as always we have changed each of their titles to drive you crazy… Enjoy!
If geeks ran our TV lineups what would they look like? (PIC)
Where is my server’s hard drive space going??
Walk out of the shower recharged or at least very shakey! (review)
How can I configure a Static IP on my Ubuntu Server?
Why does Word keep flucking closing on me? What is safe mode??
Letter on your keyboard busted? Easy quick solution!
Prevent Apps from pinning themselves to your start menu!
Free Exchange server to keep you and your partners in sync?
WOL? WTF is that? Save $$$!
System Admin Day Awareness Video. (PSA)
How do you copy a files path?
_TheNothingFunnyHereAdmiN_
 So you like to share you music eh?
Don’t worry we wont narc on you and we will even help you to find out who on your network is listening to your tunes. When you go to close iTunes down and it yells back at you that someone is connected to your library – what do you do?

Leave it open so they can continue to get their music on? Close it even quicker because the concept of sharing scares you? Look to disable sharing all together?
Either which way this simple dos command will point you to who is listening to your music.
You will see something like this if you have someone connected to you:

Now you can make an educated decision depending if its Bouncy Betty in HR or Smelly Mark in Editorial… 🙂 It attempts to resolve net-bios names but that doesn’t always work. But hey an IP is as good as a name around my office. And here 192.168.1.108 is a fugly intern. Can you guess what I did?
Update: Apparently there is an installable app that will do the same thing on Windows or Mac. Check iTunes monitor out here.
I got this question from someone named Inga in Amsterdam and it made me laugh. It also immediately made me think of this Dilbert cartoon strip:
 The answer I sent back to Inga was:
No the Internet is MUCH worse because it is socially acceptable – look people are doing it as they walk down the street…
Inga wrote back one final time FTW:
What do you think they are doing with Crack in the streets out here??
_TheTrueThatAdmiN_
 We all tag on a daily basis, Not like we used to – hitting each other and going… YOUR IT!
I’m also not talking about graffiti and catching tags and fill-ins. Even though the above geeky graffiti shot is hysterical… But as usual I am going off topic!
I am talking about tagging images, blog posts, documents or what have you for easy indexing and searching. Do you find it strange that you can’t do this on Windows with everyday files?
Well it would be, IF you couldn’t but you can and AtA is here to give you a quick how to. If you right click on any file on your computer and bring up its properties and click on the summary tab and you will see a comments field.

I am sure you have given this a glance or two before but now lets put it to work for us! You can add a field to your windows explorer to display these comments like so:
- Goto Windows Explorer
- Right Click on the top bar and select more
- and then comments like you see here:

To enable this on ALL folders across your machine, after making the above change goto tools Folder Options and hit that magic Apply to all Folders Button.
 Now when you view a folder listing you will see your comments and give you a better idea of what’s what. Or you could name your files appropriately to begin with and not just HotChick1 and NewDocument8992… But hey to each there own!

And as a bonus if you want to search this field you can download Windows Desktop Search 3.01 and you will be greeted with a slew of new search options! Enjoy.
_TheTGIFAdmiN_
If geeks ran the world (more than they do already) this is what our TV guide would look like:

[Via blogoscoped]
 (NOW BACK IN STOCK!)
Hey there??? Hi!!!??
How’s it going?????
Nothings wrong! Why do you ask????
Oh no. We always shake lIkE thAt!
DoEsN’t EveRyOnE???
Alright we got the pleasantries out of the way now – Holy crap it has happened. This is something straight out of Futurama. (Sorry for the re-run!)
That’s right you shower and lather up this “Shower Shock” and get a heaping dose of caffeine.
Just don’t stay in there for hours and come out shaking. Unless of course you are into that kind of thing. Don’t worry we don’t judge…
Check out this item from our favorite online shop ThinkGeek – Starting at $7 a bar. It’s cheaper than Starbucks – Kind of…
Mornings Have Never Been So Invigorating!
- Tired of waking up and having to wait for your morning java to brew?
- Are you one of those groggy early morning types that just needs that extra kick?
- Know any programmers who don’t regularly bathe and need some special motivation?
Introducing Shower Shock, the original and world’s first caffeinated soap from ThinkGeek. When you think about it, ShowerShock is the ultimate clean buzz.
It Works! Featured On…
- TechTV
- NBC
- MSNBC
- CNN
- Good Morning America
- Washington Post
- Ripley’s Believe It Or Not
- Your Bathroom!

Shower Shock is an all vegetable based glycerine soap which does *not* contain any harsh ingredients like ethanol, diethanolamine, polyethylene glycol or cocyl isethionate. So it’s a gently invigorating soap 😉 Scented with peppermint oil and infused with caffeine anhydrous, each bar of Shower shock contains approximately 12 servings/showers per 4 ounce bar with 200 milligrams of caffeine per serving. No, we’re not kidding and no you don’t eat it. The caffeine is absorbed through the skin. For maximum effect, ThinkGeek recommends that you build up a good Shower Shock lather across your entire body before rinsing!
Have smelly co-workers that sleep in too much? Give them the gift of Shower Shock… Plus AtA gets a few pennies on the dollar for your purchase via any of these links! Help us help you by buying us a new server and getting some stuff in the process… Who doesn’t need stuff!
Or for that smelly geek you can’t bring yourself to get any where near even when you need their help!
_TheShakEyAdmiN_ sEnD MorE samPlEs PlEaSe 🙂
 It’s an Admin’s worst nightmare (well one of them).
A server’s system disk is quickly running out of space for no apparent reason. You know that when the system drive fills the server is going to shut down and you’re going to have a lot of unhappy users. You need to find out what is taking up so much space.
There are several tools for looking around your drive and getting a visual image of what is on it. Tools like WinDirStat, Folder Size and TreeSize all do a nice job of showing you where all that space is going.

But sometimes you need a quick and dirty tool and (if you’re like me) you don’t want to install something on your servers unless you really need to.
That’s one great thing about SequoiaView, it gives you a nice visual map of any drive or folder without installing anything. Download the zipped version, unzip it and run the executable. There’s nothing to install or risk messing up your servers with. Delete the whole folder when you are done and there’s no trace of it.
 Of course, I am using JFFNMS to monitor my network so I was able to learn about this impending disaster early enough to do something about it. In my case – I had forgotten to reconfigure the IIS logging on my Exchange server, so the OWA logs were slowly filling up the system drive since they default to Windows\System32\LogFiles.
What do you use to monitor disk space on your servers? Do you have any horror stories to share with AtA? Well that is what the comments are for!
![]() Hello fellow geeks and geekette’s! It is I, El Di Pablo back with another quick Ubuntu tip. I thought of this because I am working on creating an Ubuntu 8.04 VMWare GSX server for my company. I figured I might as well write about it on aTa while it is still fresh in my mind.
Hello fellow geeks and geekette’s! It is I, El Di Pablo back with another quick Ubuntu tip. I thought of this because I am working on creating an Ubuntu 8.04 VMWare GSX server for my company. I figured I might as well write about it on aTa while it is still fresh in my mind.
As with most servers, you want to configure it for static IP addressing to make life a little more simple for everybody. Linux servers are no exception. The only trouble with some flavors of Linux servers is that they are strictly command line for less overhead and better performance. So how does one configure Ubuntu server for static IP addressing in the terminal you ask? Simple:
- First you need to edit /etc/network/interfaces using your favorite text editor (I like nano):
sudo nano /etc/network/interfaces
- Next you need to enter your static IP information:
#The primary network interface
auto eth0
iface eth0 inet static
address 192.168.0.100
netmask 255.255.255.0
network 192.168.0.0
broadcast 192.168.0.255
gateway 192.168.0.1 - Save your changes.
- Now you need to point your server to your DNS server. To do this, you need to edit /etc/resolv.conf:
sudo nano /etc/resolv.conf
name server xxx.xxx.xxx.xxx (Replace the x’s with the IP address of your DNS server)
- Save your changes, then restart your network:
sudo /etc/init.d/networking restart
- Now test it by pinging http://www.asktheadmin.com. If all went well, you should be all set!
Have you had to set up a production Ubuntu server in your environment? Tell us about your experience in the comments!
By: El Di Pablo of Bauer-Power

We got an email from our buddy Jay from Mosio.com and he was having some problems with Word 2003. It seems it is a pretty common issue and let’s see how we helped him out.
Check it out below:
Hi Admin, I have a question for you – Word crashed on me, and now when I start it up, it says
If I continue, I get the following: (Do you want to start in safe mode?)
If I choose No, I get the 1st crash message again, and the cycle repeats.
If I choose Yes, Word starts ok, but it’s in Safe Mode. Thoughts? Do I need to re-install office? Jay
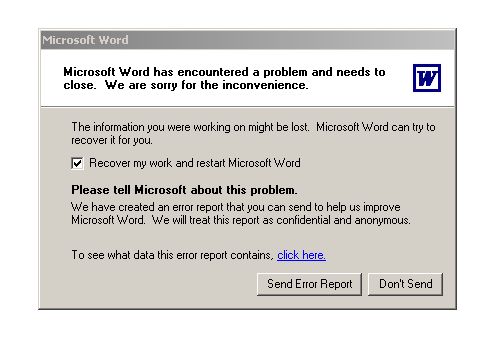

Admin: What version is that 2003?
9 times out of 10 it is template corruption. I have A LOT of info about this issue. But long story short run winword.exe /a and see if it works.
This loads word without add-ins. If it works your normal.dot is corrupted. Rename it normal.old and make sure word is closed down fully – restart if you are not sure. Then start word normally – let me know how it goes.
You’re magic, Karl. Worked like a charm. Thank you!! J
So what did we learn today boys and girls?
Your normal.dot opens every time as your blank word document. By renaming it we forced Word to recreate it and then we were golden. Are there any other solutions you know of?
_TheHellFrozenOverAdmiN_
 A Firefox extension called RSS Ticker turns your Firefox live bookmarks into a scrolling RSS ticker. Thats right! You wind up with an amazing bar of scrolling RSS goodness. The RSS Ticker sits below the status bar and shows your live bookmarks as they are updated. Almost every thing about RSS Ticker is customizable, like placement of your feeds, update intervals, number of feeds shown, scrolling speed,width, etc.
That’s right no more waiting to go check out the AskTheAdmin.com RSS feed – get updated information ASAP! I know this may stop some of you from dropping by the site as often – but to make our readers quality of life (tech) a little better we will risk it!
If you check your feeds any where as frequently as I do this will do wonders for you! Now your browser will check your feeds without interrupting you.


RSS Ticker is a free download for all platforms that can run FireFox. Awesome app Chris! Keep up the amazing work. [ChrisFinke]
And if you haven’t noticed that character is from a new cartoon strip called Being Five that we are syndicating at the bottom of any AtA page!
_TheTickingAdmiN_

So after an early morning visit to AtA I noticed our feed burner count was down drastically and that our Page Rank has dropped from a 6 to a 3.
I would say that Google is hating on us but we have had a huge INCREASE in traffic from Google in the last week or so.
So I shrugged my shoulders and started investigating. It turns out Feedburner is not displaying our email readers stats within our Subscriber number. Then when going to blogger I got some intermittent errors. Guess Feedburner IS getting Googlier as they put it.
I hope they are getting ready to roll out some great new features and not letting the Goog break shit!It looks like loads of sites got crushed with the same PR drop. According to DailyBloggingTips look at these drops:
- Statcounter (from 10 to 6)
- Engadget (from 7 to 5)
- AutoBlog (from 6 to 4)
- Problogger (from 6 to 4)
- Copyblogger (from 6 to 4)
- AdesBlog (from 7 to 5)
- Search Engine Journal (from 7 to 4)
- Quick Online Tips (from 6 to 3)
- Search Engine Roundtable (from 7 to 4)
- Blog Herald (from 6 to 4)
- Weblog Tools Collection (from 6 to 4)
- JohnTP (from 6 to 4)
- Coolest Gadgets (from 5 to 3)
- CyberNet News (from 6 to 4)
- Washington Post (from 7 to 5)
- Washington Times (from 6 to 4)
- Charlotte Observer (from 6 to 4)
- Forbes.com (from 7 to 5)
- SFGate.com (from 7 to 5)
- Sun Times (from 7 to 5)
- New Scientist (from 7 to 5)
- Seattle Times (from 6 to 4)
But we got hit harder going from a 6 to a 3! Damn you Google, Damn you to Microsoft. (That would be hell for Google right?) Are you seeing drops? Vent in the comments!!

I tend to get this call even more often then the “My password doesn’t work.” phone call. It’s the ever so popular “My keyboard is broken and I can’t type – fix it!” call. I will remote desktop into their machine and check it out. Doing my usual thing saving documents and checking the device properties.
8 times out of 10 the keyboard is unplugged and does not show up in device manager. There is a 1 out of 10 chance it is the batteries going dead in their wireless keyboard But, there is the occasion that the keyboard is actually broken (the end user normally has spilled something on it.)
Sure this is one of those physical jobs that someone needs to walk on over to the machine in question and smack it around a little. BUT if your user NEEDS to type in a password to clock-in or something urgent you can have them open up the little know XP and Vista On-Screen Keyboard via the mouse.
c:\windows\system32\osk.exe

Don’t support end users? How about a machine that has a busted caps lock, num lock or some other key you HAVE to be able to hit during an install?
Do you back down and look for another keyboard? Hell No! You open up this biatch and do what you have to do like a good Admin!
Do you use the OSK for something? Let us know in the comments!

Am I the only one that finds this hysterical to hang in a computer lab?
_TheBigBrotherAdmiN_
 Your friendly neighborhood Admin gets piles of messages about Vista’s UAC and how much users
 despise Microsoft for doing this to them hate it. We showed you how to disable it here, how to use a super Administrator account here and The HowToGeek’s method for disabling UAC for Administrator accounts here.
Did you say something about cake? Sorry I am easily distracted this early in the morning…

Ah UAC Prompts getting you down? I have one word for you HotKeys (I put them together and that makes them one word! Like RTFM!) When your UAC pops up just hit
Alt-C this will activate the C in the Continue Button via its hidden Hot Key. Simple eh? Well not really if you think about it logically (Unlike Microsoft) C could mean Cancel or Continue… But whatever it works!
Does this make your life easier? Let us know in the comments. I have this strange craving for cake.
 Reader Jay writes in:
I have a question for you Mr. Admin, after running or installing an App why do some of them find a new home on my start menu? This is really annoying can we turn off this
annoying piece of crapfeature?I know I can manually remove them but I hope you can stop it all together!
As always Jay we have several solutions for fixing your issue and hopeful helping maintain your sanity.
- Right click the Start button
- Properties
- Customize button
- General tab
- Under Programs
- Set Number of programs on Start menu to 0 (zero)
- Click the Clear List button
- OK
- Apply
- OK
Now to prevent them from coming back:
- Set number of programs on Start menu to be 0
- Hit the clear List button

Option #2: Group Policy on XP Pro
- Start
- Run
- Type: gpedit.msc
- OK
- Navigate to >>> User Configuration \ Administrative Templates \ Start Menu and Taskbar Remove frequent programs list from the Start Menu
And finally not for the faint of heart – we can do it via an registry edit:
- Start
- Run
- Regedit
- Navigate to HKEY_CURRENT_USER\Software\Microsoft\Windows\CurrentVersion\ Policies\Explorer
- NoStartMenuMFUprogramsList
- Check the DWORD value
- A value of 1 is enabled, and a value of 0 is disabled.
Never again will your emabrising applications be pinned to your start menu just because someone in Redmond thought it would be a good idea!

And for some more good reading check out:
Why should you image?
When you have one machine to deploy, you insert your CD or DVD, click through the prompts, enter your license key, install all your software and make your customizations. It’s time consuming, but when you only have to do it for a single machine it’s not too bad.  What happens when you need to deploy 10 machines, or 50, or 1000?
There is no way you are going to do 500 machines one at a time by yourself. It takes too long, it is error prone, and when you are done, every machine is going to be slightly different. What you need is a way to build one machine exactly the way you want it, and then make 500 copies of that machine. That is what disk imaging can do for you.
Using Imaging For Desktop Deployment
I am the Network Administrator at a small manufacturing company. At the end of 2005, we purchased about 30 new desktop systems that needed to be configured and deployed. The systems came from the manufacturer with Windows XP Professional and various versions of Office 2003 installed.
Some machines were unique, but the bulk of the machines consisted of only two configurations. The machines either had Office 2003 Standard Edition or Office 2003 Small Business Edition. All the other software on all the machines would be identical including our primary LOB application.
Although it was only 30 machines, this is a perfect scenario for system imaging since there would only need to be two images. Deploying systems by imaging leads to easier and faster deployment, more consistency and easier rebuilds. In addition, knowing that all your machines are configured identically makes updating and troubleshooting much easier.
Configuring The Sample Machine
I started by taking a representative unit and configuring it in the most generic way possible. The manufacturer already installed Office but it was not activated or configured for a specific user, so I left it that way. All other software was installed and configured using the local Administrator account; the sample machine should NOT be joined to the domain during the setup process.
All updates and patches were installed and all unnecessary services were disabled. It is very important that you carefully document your work during setup. Once setup is complete, you need to test the configuration to be sure it actually works and that your users can perform their jobs. Invariably you will discover something you forgot, and if you need to make changes to your setup, you need to know where you started. Testing is the most time consuming, but vitally important, part of a deployment. You don’t want to roll out an image to 500 machines only to discover a problem that is going to require you to visit all 500 machines to fix. It is much better to test and retest the image BEFORE it is deployed. Changing images after you have created them is a time-consuming process.
Using Sysprep
Once you have the system in a stable working state you need to prepare it for imaging by using Sysprep. Sysprep is a free tool provided by Microsoft that removes all the machine-specific information from the computer. There are many good articles available from Microsoft about how to use Sysprep.
There are several versions of Sysprep available so be sure you use the version that is designed specifically for the operating system you are imaging.

Sysprep can be a little confusing the first time you use it since it’s not always obvious what the different settings do. The best way to see the differences is to Sysprep a system using different settings, reboot the machine and observe the results. As with the rest of the setup, document your work carefully so you know what settings are correct for your environment. After running Sysprep for the final time the machine is shut down and the drive is ready for imaging.
Creating and Using The Image
There are many tools available for imaging disks. I used Symantec Ghost and had good results with it, but any imaging tool should do the job. The most important thing to consider when selecting an imaging tool for deployment is how are you going to save the image and get it onto all the other machines? If you can’t easily restore the image to a bare metal drive, it doesn’t do you much good. I opted to save the two images to DVD-Rs. That way I could boot the machine from the Ghost recovery disc and use the DVD-R to restore the image to the bare metal drive without any network connectivity or other hardware. You can save images to a network drive or removable hard disk, but you need to verify that you can access these devices from the restore environment.
Once you have installed and configured the software on your sample machine, run Sysprep, and imaged it, the hard work is done. Now, any time you need to deploy a new machine all you need to do is restore the appropriate image to it, join it to the domain and add the user account. When the user logs on, they will have all the software they need and be ready to work.
If you hire a new employee, all you need to do is obtain the new hardware, restore the image and it’s ready to go.
Imaging Vista
 I performed this deployment about 18 months ago. With the release of Windows Vista, Microsoft has released the Business Desktop Deployment 2007 tools.
These free tools provide some powerful alternatives to Sysprep and third-party imaging tools. The BDD tools are geared towards Vista but work with Windows XP also. If you are getting ready to deploy machines, and especially if you are going to deploy Vista, you should investigate the BDD tools.
Tips And Pointers
Create as few images as possible. Every image you build requires the same level of testing and maintenance, so the fewer images you have the better. It’s easier to create a few master images and configure the machines a little after imaging them than to create a new image for a handful of machines. Use the hardware as the primary determinant of the number of images you create.
You can only restore images to machines with identical (or very similar) hardware. If you restore an image to a machine with significantly different hardware, the image won’t contain a driver for that hardware and the machine will likely crash.
Partition the hard disk during setup. Create one partition for the operating system and the applications and other partition for the user data. That way, if the system gets really hosed, you can restore the operating system partition without disturbing the user data.
You can also use disk imaging to deploy servers. The process is similar, but you have to be very careful of the hardware differences. Many organizations have identical desktops, but not many have large numbers of servers with identical hardware.
I don’t know about you sometimes we find files that were downloaded weeks ago and wonder where they came them. Usually on my PC I just shrug my shoulders open it up and see.

Well, it turns out that OS X has this little known feature built-in. You just have to select the file and hit “Command-I”. It will display the info as usual. You can then click on the arrow at the left of “More Info”. The “Where from” option will appear with the URL of where you got the file. The only thing I noticed is that it seems to work only when you download the file with Safari. It doesn’t look like Camino or Firefox records that info.
Remember if you already de-compress your archives this wont work – it needs to be the file downloaded.
 I have been doing the tablet thing for a little while now and as you all know I blog daily. So when I came across this “Snipping Tool” in Vista I feel in like. Now I don’t know if it’s like like or just like but time will tell! Redmond brings us this HUGE improvement on screen-shotting.
I used to strictly do control-Print Screen and paste into Photoshop, modify and save for web. Now it looks like MS lets you select what part of your screen you want to “Snip” and gives you multiple options for saving it – like jpg, gif or png! And check out the other goodies below in this screenshot:

Here is what Microsoft has to say about their Snipping Tool:
You can use Snipping Tool to capture a screen shot, or snip, of any object on your screen, and then annotate, save, or share the image. Simply use a mouse or tablet pen to capture any of the following types of snips:
- Free-form Snip. Draw an irregular line, such as a circle or a triangle, around an object.
- Rectangular Snip. Draw a precise line by dragging the cursor around an object to form a rectangle.
- Window Snip. Select a window, such as a browser window or dialog box, that you want to capture.
- Full-screen Snip. Capture the entire screen when you select this type of snip.
After you capture a snip, it’s automatically copied to the mark-up window, where you can annotate, save, or share the snip.
If you have Vista Basic or CAN’T find the snipping tool check out this information from PC World on how to “Activate” it.

If you have a version of Vista other than Home Basic, you already have the Snipping Tool screen capture utility: Choose Start, All Programs, Accessories, Snipping Tool. If you don’t see it there, it may not be activated. Go to Control Panel and open Program and Features (you may have to click Programs first). In the task pane on the left, click Turn Windows features on or off. If necessary, click Continue when prompted by User Account Control. Scroll through the list of features, check the box next to Tablet PC Optional Components, and click OK. Turning on these features gives you not only the Snipping Tool, but also the Tablet PC Input Panel, Windows Journal, and other stylus-related features.
Here are 5 tips courtesy of About.com for when to use what formats:
- If your screen shot contains a limited number of colors and you want to retain crisp lines and keep the file size small, save as a GIF file. If your screen shot contains many colors and you want to retain crisp lines and full quality, save as a PNG file. If your screen shot contains many colors and you want to make the file size small, save as a JPEG file.
- Before saving your screen shot, you can use the Pen and Highlighter tools in the Snipping Tool toolbar to add markup to your screen shot. The eraser tool will remove marks made with the Pen and Highlighter Tools.
- You may email a screen shot without saving it by using the “Send To” button on the Snipping Tool toolbar.
- Go to Tools > Options to change the way the Snipping Tool operates. For instance, you can change the color of the selection outline by selecting a new ink color, or turn the outline off entirely by unchecking the box for “Show selection ink after snips are captured.”
- Enable the option “Display icon in the Quick Launch toolbar” if you want to keep the Snipping Tool handy for quick access.
 How many times have you been asked online to provide your personal information, such as your name, number and e-mail address? If you are like me, thousands of times, almost everyday. Each time you do it too, you have this aching feeling in your stomach, because you know you are about to get about a thousand spam e-mails now.
So, what are you supposed to do? Give them a fake e-mail address? Perhaps, but what if they require verification. You know, they send you an e-mail and you have to open it up and click on some link. What are you supposed to do then?
I’ll tell you what I do, I go to a little website called 10 Minute Mail. The name says it all, they give you an e-mail address that is literally only good for 10 minutes. If you need additional time, there is a link that resets the timer. After the time is up, the e-mail address self destructs. No muss, no fuss, and more importantly, no spam!
This service is absolutely free. However, if you decide to use it, they ask for a small donation through paypal. The donation isn’t mandatory, but it is a nice gesture.
By El Di Pablo of Bauer-Power.net
What does your rack or server room look like? Shoot us some Pics of your gear to Pics at AskTheAdmin Dot Com.

Here is a picture of what your network rack should NOT look like! I would hate to have to trace cables from the patch panel to the umm whatever other equipment is under there! Looks like it might be time to get a cable management solution!
How do you do cable management?
 Great open-source utility to recover lost Windows account passwords or to break into a locked machine.

these are actually a bunch of tools that can be installed on Linux, Windows & Mac. but I want to focus on the Live CD version of the application. the ophcrack team has compiled a complete all-in-one Linux boot CD that automatically loads the tool and starts the cracking process.
Happy Mother’s Day Everyone!
 So I got a frantic phone call yesterday from a buddy of mine who lost his PST file due to a crashed hard drive.
The thing is this guy normally backs up EVERYTHING! I was shocked he didn’t have another copy ready to go.
When I asked him why he didn’t back up his PST file regularly he kind of stared at me like a deer caught in my headlights and e said:
“Whats a PST? Is that like pssssst?” He made a come here gesture with his finger and I laughed.
So here we go! Your PST file is where Outlook stores your information like email and calendar information, on your local machine. These directions will do for all outlooks 97 or better.
First things first; we need to shutdown outlook and locate your PST file. So just follow these easy steps and you will be golden.
- Search your PC for *.PST and make sure you select search hidden files and folders is checked. Also make sure there is a check box next to search system folders.
- Highlight your PST file on the right it will be the one with the most recent access date.
- Right Click — Copy
- Paste your file to a USB memory stick, dvd, cd-r or a network share. (Make sure outlook is closed or you will not be able to perform this step!)
You can now rest easily that all of your contacts and saved email pictures of your friend with a felt tipped mustache will be saved forever – or until you destroy the disk!
Come back for how to archive data out of your PST to make it smaller.
_TheBackedUpAdmiN_
 I don’t know how useful this actually is but I thought I would share it with you guys anyway.
You seem to like useless information… Right??
This trick threw me for a loop. I was watching a junior admin install Windows Vista from a CD and he turned to me smirked and said
“Want to see something cool?”
You can open a game of Pinball or Solitaire during an install. Sound appealing to anyone? That’s what I call multi-tasking 🙂 So Shift + F10 will get you to the command prompt during an install like the shot below. It works on XP as well.

It only works from the GUI portion and not the white text on blue background parts. I googled it and saw some speculation on using it to inject drivers or folders during your install. But isn’t that what Nlite is for?? 🙂 Microsoft themselves said the following:
In some cases, it may be helpful to have access to a command prompt during GUI-mode Setup for the purposes of troubleshooting, copying drivers, starting and stopping services, starting tools such as Task Manager, or other for other needs.To gain access to a command prompt during GUI-mode Setup, press SHIFT+F10.
Do you use this? Did you know about this? Why didn’t you tell me? Sheeeesh!
_TheLearnsSomethingNewEverydayAdmiN_
 Hi boys and girls,
Do you remember when Ask The Admin covered a very interesting topic of Free Exchange services? For those who don’t, you can look here, here and sometimes here.
In a nutshell, this article talked about how me and my fiance’ had to plan our wedding and had tons of appointments flying in from both directions.
In order to get our two phones talking to one another and playing nicely, I used a free Exchange hosting service called www.Mail2Web.com to enable my WinMo PDA and my fiance’s Blackjack to sync calendars every 10 minutes logging into the service through ActiveSync, as if they are the same phone. As a result, both phones would have the same calendar information, and keep it that way every ten minutes.
I’ve had this system going for some time now, and it’s been working just fine. I haven’t even had to login to the control panel for anything!While figuring out this howto, I noticed in my own phone that WinMo gives you 4 categories of info items to sync, (as illustrated by the image so cleverly placed on the top of this blog) – Contacts, Calendar, Email, and Tasks. I realized that my fiance’s BlackJack also had the choice of 4 different points of info to sync. This meant that every WinMo device can choose which information to sync with an ActiveSync Server Source and more importantly, which information NOT to sync with an Exchange Server. So we’ve established that my fiance’s BlackJack and my ATT 8525/Hermes were acting as if they had the same calendar – consider them synced.
So this was a real world problem solved by the fact that 2 people have phones with WinMo and Activesync, and the availability of a free exchange service @ www.Mail2Web.com.![]() Now onto the next real-world problem: The Admin and I have a lot of tasks involved with keeping our beloved website up and running, current and fresh. Throughout the months tasks have come and gone, but certain tasks fell through the sieve and got replaced by more current, more urgent tasks that took precedence at the time. So basically tasks were getting lost. Since neither of us used the built in Tasks application in WinMo, this presented the perfect opportunity to put my theory to the test.
Now onto the next real-world problem: The Admin and I have a lot of tasks involved with keeping our beloved website up and running, current and fresh. Throughout the months tasks have come and gone, but certain tasks fell through the sieve and got replaced by more current, more urgent tasks that took precedence at the time. So basically tasks were getting lost. Since neither of us used the built in Tasks application in WinMo, this presented the perfect opportunity to put my theory to the test.
I know that I already have 2 people logging into MY Mail2Web account to sync calendars. But what would be wrong with 3 people logging into that same account – except that my Fiance’ will only sync Calendar information, and The Admin will only sync Tasks information (and NOBODY syncs Contact information).
So I had the The Admin log into my Mail2Web account through his ActiveSync Server Connection and sync only Tasks, and I had my own phone begin to sync Tasks with the same service it was already syncing to for Calendar information, which coincidentally my Fiance’s phone was simultaneously syncing Calendar information with as well.
Problem solved:
Me and the Admin with synced Tasklist,
Me and the Fiance with synced Calendar.
Free.
Automatic.
Just the way we like it.
AskTheAdmin.com.
Free Tech Support for the Masses.
Commodore 64 (the one you used to play Bruce Lee on.)
 If you are any type of respectable geek you have one or more machines at home that you use to store your
 porn important data, documents and backups.
You probably also leave these machines on all the time. If you’re not using them to pull down torrents all night or need to remote into them, you really should shut them down when they aren’t being used for long periods of time. Shutting them down would save a lot of electricity, which will save you money.
By now you’re thinking, “Yeah, that sounds good, but it’s a PITA to turn them on and off all the time. And some of them are headless so how am I going to do that?”
You use Auto Poweron & Shutdown. The application runs as a Windows service and lets you schedule multiple on and off schedules per day, week or any custom schedule you want.

Technically, it doesn’t power down the machine completely, it puts it into hibernate. Obviously, if it was completely powered off, it wouldn’t be able to turn itself back on. But you can use the app to fully power down the machine if you really want to.
I have been using it to shut my file and print server down every night and then power it back on before I get up in the morning. I also power it down during the day when I’m at work and then back on before I get home. I have customized the schedule so it only shuts down during the day on weekdays.
Instead of running the machine 168 hours a week, I’m now running it less than 87 hours a week. That’s a 50% reduction in power with no real effort or inconvenience on my part.
The application costs $24.95 and there is a 30-day trial. I know we all love free stuff, but depending on how much you pay for electricity you’ll probably save more than you pay for it within a year.
There are tons of ways to shut a machine down at a specific time, but this is one of the very few I found that can turn a machine back on at a scheduled time. Do you know of any others?
 I was happily surprised by SharpCast’s SugarSync. I got a free subscription from their PR department so I gave it a whirl.
I installed a little application to sync my HUGE pictures, music and work folders with their site. The purpose of sugarsync is to keep all of your important files synced up across whatever machine you are using. Easy access to your stuff from any internet connected device. I was thinking of all the cool things I could do with their mobile app that would allow me to have my camera phone pictures automatically synced with my desktop and laptop. But that’s not all I can do while I am mobile now – I can also access my ENTIRE photo collection and music on the go. I don’t know if that means the same thing it does to me – but it makes me smile when I run into an old friend and I can pull up obscure pictures from that binge crack den rave Formal Gathering… No matter what phone or device I have on me. Are you with me?
I poked around and really like its features like sharing, auto zip/download and the magic briefcase is easy to use and the set it and forget it type dealey. Like a storage place that your stuff automagically teleports copies of all your… Oh wait its really not like that at all

But long story short I really got a chance to use SugarSync to recover from a hard drive failure. My home computers primary hard drive started sputtering and suddenly died. My only recent backup was no where to be found and I had copied over 4gb of pictures off of an SD card I then cleared.

Ah but sugarsync to the rescue I was able to zip my 11gb and download it back to my reimaged machine on a new hd.
For $25 bucks for the year or $2.50 a month you get piece of mind like a mofo. And I like cheap insurance!
Comment why you want to use Sugar Sync and you might get picked to be given a free year subscription. Speak up make your self heard AtA!
_TheGiveAwayAdmiN_
 Have you ever brought up a Open dialog and thought to yourself…
The Microsoft boys must have heard ya because here it is on your context menu!

It doesn’t work in XP but… now it is an option, in Windows Vista.
What you need to do is hold down the shift key, while right-clicking the file or folder…
“C:\Users\Public\Pictures\Sample Pictures\Creek.jpg”
Note: This will also allow you to copy the path of a folder to the clipboard. This becomes VERY handy in grabbing a long path and definitely can save you a few clicks.
Anyone have a way to add this functionality to XP?
So I am sure all you guys know that July 26th is SysAdmin day. Yes we have our own holiday – didn’t you know? We told you a little bit about it last hear on July 26th and I am guessing my tardiness and procrastination didn’t help my cause in promoting the holiday.
No I didn’t get one gift or even a thank you. But this year I am going to start spreading the word early.

And to help me out (thanks to faithful reader JoeG) here is a little YouTube-age for your perusal.
And remember your System Admin is the guy who knows all the FLUCKED up websites you visit and handles the email filters… Be nice to him – it’s to your own benefit! Picture used without permission from SysAdminDay.com.
 We got this message from Fred early in the AM. I guess its great for him that we don’t sleep past 7AM anymore!
I am using Outlook 2007. When I get email the pictures show as Red boxes with “X”’s in them. I used to be able to right click on the boxes and download the pictures. Now for some reason, I right click but the pictures don’t download. I don’t get the option to download a second time so the system must think the pictures are showing. Please help.

We went back and forth trying to enable and disable security options inside Outlook and Internet Explorer but we weren’t having any luck. I didn’t want our faithful reader to start bashing his head against the monitor. So I said screw it and went a’ looking for the registry value. Here is what I wrote back to Fred:
Found the solution, it is a registry entry called BlockHTTPImages found at this location.
\HKCU\Software\Microsoft\Office\12.0\Common\BlockHTTPImages
change the value 1 to 0 (zero) and reboot. All your images should have returned.
I was sure that was going to resolve our early morning Outlook hi-jinks and it sure did! Here was Fred’s final response:
YOU DID IT!!!! I don’t know how to thank you. This has been driving me nuts! I found that a lot of people are having the same problem (from reading other forums) and nobody had a solution. Thanks again. Fred
 What up AtA?
It’s a beautiful morning out here in New York City. All my servers are purring along this morning nicely and I can actually enjoy my cup of coffee without resorting to gadgets. The Data Center was strangely quiet – no one around. No one restoring, repairing or goofing off.
I guess now is as good time as any to catch you up on recent popular AtA stories. The titles have been changed for our amusement.
Oh and a Phillips phone I reviewed a while ago was umm accidentally shock tested. 8 stories! It has some scratches and a cracked battery cover but it still works! FTW! I up my recommendation to BUY THIS THING!
- No To All? How come it doesn’t exist?
- Copy all my settings from one Windows Machine to Another
- What the fluck is Auto Text?
- FiOS Review
- Change your default search engine in FireFox.
- Don’t overspend on Vista!
- Copy ALL your printers settings and drivers to a database.
- How can I see through one window to another?
- If you don’t have an hour to kill DONT click this link.
- XP SP 3 is Here!
- XP SP 3 – Firewall issue.
- Strike Through issues in Blogger?
- Control Alt Delete on A Mac.
We want to hear from you! If you have some tips, tricks or death threats – forward them along to tips at askTheAdmin dawt com. If you can’t figure out how to send us that tip – chances are we don’t want to hear it! 🙂
 They say necessity is the mother of all inventions, except for the bastard children of people looking to be lazy and productive.
Tinyurl has been around for a long whiles now and many of you probably use it on a daily basis and don’t even know it. Websites use it to hide links, people use it to make it easier to tell someone a link over the phone as well as using it to overcome the limitation of how many characters you can type in a mobile browser.

It is very straight forward and best of all it is free. As we say at Ask the Admin – Free is for me!
Just go on over to http://www.tinyurl.com Input the link and boo yah you are returned with a short link.
Use it how you will. For good or evil – to get porn links through email filters, freak out your friends with unexpected goatse or something equally as disturbing (Rick Rolling) … Any ideas?
Do you use tinyurl or something similar?
I get asked this one A LOT – it’s right up there with “Where is my right mouse button?” and “Where’s the start Menu?” We enjoyed this response and thought it would be nice to share it.
 After using a mac for coming up on 3 years, not one single time has the operating system crashed, frozen, or had any other type of hang ups.
However, sometimes applications will freeze up and you get the spinning ball that just wont go away. You can either sit there and wait for it to time out and eventually close, or you can do a Force Quit on the application causing problems.
The Force Quit is not a Jedi mind trick even though it slightly sounds like it could be. The Force Quit is a lot like the ever familiar control alt delete on a PC. To initiate a force quit just hit the option+apple+escape key command and a window with all of your currently running applications will pop up. If an application is not responding, then it will show up in red and have a “not responding” message next to it. Just highlight it in the list and press Force Quit. The application will instantly close and you can go about your business. [Mac Utopia]
 Makes you want to get you key combo on eh?

Hey Admin what kind of techno magicary are you in possession of over at aTa HQ?
Your Strikethroughs come through well timed and hilarious in both my web browser and my feed reader.
But alas, when I try to do the same thing in either blogger or word press it looks like CRAP in my feed reader. Like this:
I like pornscience
Notice no strike… And it eats a space. But yours does work… Why?
The built in mechanism for Word Press use a different command for the strike. And seeming that is where most new bloggers see it and use it for the first time they attempt to use the same code for the strike. When it works in the browser normally the blogger is satisfied and calls it a day. But emails and Rss feed readers DO NOT render the same way. There code looks like this:
Your friendly neighborhood admin doesn’t do the wizard thing and codes in the html portion of his blog editor and uses a normal s and /s in brackets to open and close what I want striked. Like this:
 and this code winds up looking like this:
The S just works and I have tried the Strike command as well and it doesn’t do what it is supposed to do. So long story short stick with the S – Simple and it goes back to the old saying if you want something done right write the code yourself.
Oh wait thats not an old saying at all.
I love obscure Simpsons references 🙂
 Hello out there in admin land!
It is I, El Di Pablo here to bring you a quick Ubuntu tip for the week. I haven’t written on aTa in a while due to my hectic schedule, but I am sure you have seen me milling about the comments quite a bit.
Anyhoo, so there I am last night, screwing around on my Ubuntu laptop surfing porn doing homework when I noticed that all of my minimize and maximize buttons were missing from my windows. The only way to minimize and maximize my windows were to right click on the bottom task bar and select it from the menu. WTF?!?!?
Well, it turns out that those buttons aren’t completely controlled by Gnome. For those buttons, Gnome uses a windows manager call Metacity. To get those buttons back I had to open a terminal and run the following command:
Once I did that, my buttons came back, and I was able to minimize and maximize like a mofo! Do you have any good Ubuntu tips/tricks you want to share? Hit us up in the comments!
By El Di Pablo of Bauer-Power
 Please follow this email chain between myself and our friend Karl AKA ATA.
—————————————
ME
Here’s the scenario….
Backed up info off old laptop to external HD.
During XP install I saw two identical drives…nuked the first partition and tried to install. XP said no. Nuked the 2nd one…XP allowed the install. JOY!!!
You know where this is going don’t you…..
Anywho…it turns out XP is able to see external USB HD’s and I nuked the MBR on the drive. Do you know of any freebie tools to recover the data on that drive? I have my bosses personal stuff on it and a lot of my own personal stuff too….and the drive states that it needs to be formatted….
HELP ME Obie-ADMIN, You’re my only hope! 😀
——————————————–
Karl
Sorry it took so long ive been in windows mobile hell today.
Do not let it format! Knoppix live cd wll fix you right up.
You will be able to see and copy everything even without the mbr.
Let me know how it goes and if it doesnt work i might have some other apps
———————————————
Me
I bought a tool to recover the drive….but…..I have a BKF file on
there that is corrupted now….any idea of any tools that are freebies
to be able to recover those files? I suppose I can get the bosses CC to
buy a tool to do it…but I’d rather not…..
———————————————-
Karl
What OS is the BKF file from? What os are you restoring to? What is the error message?
———————————————-
Me
Win2k Pro. It is saying that the BKF(windows Backup file) is not valid or something to that effect….
I am running a scandisk on it….we’ll see if it goes. I downloaded a demo of a $ product and I could see the data in the file, but I cannot get at it without paying…..
———————————————-
Karl
Are you restoring to w2k as well? Did you use msbackup or ntbackup to compress it?
———————————————-
Me
NTBACKUP to create it. Tried restoring on Win2k server and XP.
———————————————-
Karl for the win
I’d try to restore on 2k pro but if that doesn’t work check this out:
Backup Exec has the ability to read .bkf files. You can download the trial
version and use it for 60 days for free.If you go to the “Tools -> Options -> Catalog” menus, there is a check box
labeled “Use storage media – based catalogs”. If you remove the check from
this checkbox and run a catalog job on the bkf file, you should be able to
recover any files that are not corrupted. The catalog operation will take
longer to complete, but you should be able to restore any valid file within
the .bkf, before and after the corruption. Its hard to know how much
corruption there is in the .bkf file, so I wish you the best of luck.This link will give you instructions on how to import a bkf file into the
program for restore. Before performing step 6. (The catalog operation),
follow the steps above. http://seer.support.veritas.com/docs/241600.htm
———————————————-
Grateful Me
Dude……you rock.
We use BE and I never thought of trying it. Thanks to you I was able to restore….get this…..ALL OF IT.
Rock on Detroit….Rock on Chicago…NAPA, it’s the auto parts store. (If you don’t know what this is…do a Youtube/Google search on Wesley Willis)
———————————————–
So what have we learned today?
- 1. NEVER, EVER leave a USB HD attached to XP on install and NEVER, EVER nuke a drive unless you are 10000000% certain you have the right drive.
- 2. Karl rocks and has great ideas.
- 3. NAPA, It’s the Auto Parts Store
 We found this directory up on Mozilla’s servers today with this note in place:
Welcome!

This directory contains pre-
pre-pre-alpha builds of
Mozilla2. They are not yet
representative of what
Firefox 4 will look like.
These builds are not regularly
tested - use at your own risk.

For those interested, the
source code is here.


 So you have the same repetitive searches you run every day? How about you let Google run the searches for you and hit you with any new sites that have popped up since your last search? This is great for almost anything! All the PR companies we deal with use this habitually.
Just go to http://www.Google.com/Alerts and sign up for an “Alert”. this is what will be searched and returned to you via email:
 As you can see by the above screen shot – we have daily updates hitting us on the hip whenever someone posts something about AskTheAdmin. Works great for watching people talk shit and such 🙂
This is just one of Google’s many untapped resources. Check out this great article from Lifehacker on the top 10 Google Products you probably forgot about!
 So after installing Windows XP SP3 this morning I noticed that the Windows Firewall popped up on restart asking me if I wanted to allow My VNC server access to the internet then my instant messenger. WTF?

I hate the Windows Firewall. You can see my feelings illustrated by the picture at the top of top of this post. I have a domain group policy in place – explicitly disabling the service via a few options. That didn’t stop them from re-enabling it.
After closer inspection I discovered M$ has renamed the Firewall services’ name to be “SharedAccess” and this breaks some stuff. (I am sure they did it intentionally for the MalWare authors of the world!)
Since we do not use the Windows Firewall in my domain it is NOT configured – so when it automagically pops on – SHIT DON”T WORK FOR THE GOOD OLD END USERS!
After querying my machine for services using this command:
I got a full listing of my services and after scrolling down I found this:
 Now I needed a quick work-a-round for my SP3 test group. I created a line in my default user login script:
And that shut it down! Thanks for letting me know M$ as always I appreciate the curve ball. I know your just keeping us Admin’s on our toes!
On some happier notes, I am seeing some other great results with memory allocation and overall speediness. I am digging the updated MSTSC remote desktop client as well.
_TheNotSoBetaTestingAdmiN_
 How long was it after Windows XP SP 2 came out before you were ACTUALLY able to download it?
I remember the mad dash to download XP SP2 and how the Windows Update Servers were crawling. With this tip you can skip the 56kbps downloads and have it in a jiffy.
This super secret download link (Waiver: Not so super, nor secret but VERY nifty and a download link!) will get you ahead of the game. Totally legit files hashes and all direct from the ms servers.
Let’s see if those damn rumors of XP running 10-20% quicker after the Service Packing is done. Keep your fingers crossed for some good improvements rather than some system crashing blue screening!
Warning: This update will turn on the Windows Firewall – even if it has been previously disabled due to GP! I need to look into this further!
Double Warning: This SP has a compatibility issue with Microsoft Dynamics Retail Management System (RMS) if you use this hold off on the update
Size: 316.5 MB (331 805 736 bytes)
MD5: bb25707c919dd835a9d9706b5725af58
SHA-1: c81472f7eeea2eca421e116cd4c03e2300ebfde4
Size: 331,805,736
We found this tidbit from one of our great Admins/Writers Yaron Major out in Israel. He linked us to this story from a website called Tip and Trick.net. You can grab other languages of Windows XP SP3 from there as well including:
Windows XP SP3 Simplified Chinese
Size: 335M
MD5: a9d6f4586ec6929918b2c3fe29d0ce87
Windows XP SP3 Russian
Size: 303.8 MB (318 533 672 bytes)
MD5: e38b5c19a3d12ae8de0a12b1e098dd73
SHA1: 850cda9f57033a17d046a56d422547ea80dcaf61

- Windows XP SP3 Traditional Chinese
- Windows XP SP3 Chinese (Hong Kong)
- Windows XP SP3 German (Deutsch)
- Windows XP SP3 French
- Windows XP SP3 Czech
- Windows XP SP3 Spanish
- Windows XP SP3 Japanese
The download came in SUPER fast at around 2200kbps. I had the 316mb file in under 3 minutes.

I am installing it on one desktop, one laptop and one Virtual Machine. I will keep you guys updated! And if you want those fast downloads I suggest downloading it quickly before these servers are all jizammed up! [Yaron Maor Via TipAndTrick]
Let’s here in the comments all you early adopters takes on it! I know some of you have this installed already!!
 Have you been a busy little bit-torrenter lately?
Do you have tons of ISO’s laying around? Trying to mount them in Vista like you were used to in XP and not having any luck?
Our reader Tom in Wisconsin is and this sounds like a job for dum dum dum (key theme music)… AskTheAdmin!
Well it turns out the freeware utility offered from Microsoft to mount ISO Images doesn’t work in Windows Vista. Thankfully there’s another free utility that does work.
The utility that we will use is called Virtual Clone Drive. This utility will let you mount .ISO, .CCD, .DVD, .IMG, .UDF and .BIN files. Download the utility and start the setup process.
Select Yes or OK at the hardware prompt and continue. You might have to restart your computer. Now you should be able to mount any ISO image by just double-clicking on the file.
Note: If you are going to reinstall this utility, make sure you uninstall it first, or you’ll BSOD yourself repeatedly.
Double Note: This utility does not work on Windows Vista 64 bit edition.
_TheIsoLovinAdmiN_
 The title of this question here is a little misleading because you can use this little web app to serve lots of stuff besides quotes, like random ads or words of wisdom.
  Get your geek on and swap out scripts and images galore!
Originally we used the free RandomQuote ASP generator to feed our geeky quotes in our sub header above. Have you seen it before?
Pretty cool stuff huh? Now what if I told you the Busted Tee Shirt Ads on the right bar were also served up by this generator?
Result: Different ad and quote ,out of our database, on every refresh!

After tweaking, pushing, prodding (our coder not the program) this proved to work very well and we have been very happy with the results. But after a while we realized that this handy little random generator, complete with a very aesthetically pleasing back-end editing system, (pictured to the bottom) would be perfect to randomly feed out anything our geeky little hearts desired.
You’ll see a different quote, different ad on every page load, and all the same geeky love in front and behind it. You’ll need an .ASP compatible web hosting plan at the very least to get started. Don’t get scared – all this means is that you need a web hosting plan on the side but it doesn’t necessarily have to point to your site. Just a server that supports ASP. This is because the files need to live somewhere on a server with Microsoft extensions. It also needs to give you a few MySQL Databases to make this easier but you can also pull it off with a connection to an Access Database, and with some basic ASP knowledge you can probably modify it to work with an Excel file as a data source as well.

The first thing you need to do is go to here and snatch this free package called RandomQ from Expirion.Net:
The directions are fairly simple. Here’s the skinny:
- First copy the files/folders to your (ASP Compatible) web server.
- Then modify the config.asp file to point to your database and give it the correct credentials to do so. Refer to your web hosting control panel to see various details about your DB – you’ll need that info to put into the config.asp file.
- The package comes with a convenient little script that creates all the necessary tables/columns when run against your database. Your DB will need this structure to properly communicate with the application.
- Now open the index.asp file in the /admin folder in your RandomQ directory to see if any errors arise. If they do arise, the problem is most likely with your config.asp file. Be sure it points to the correct place and that the credentials are correct. Next be sure the tables were created properly by browsing thru the database using the web interface usually provided by your web hosting service. If it’s not provided you’ll need to get into some of the graphical database management proggies, provided at MySQL.com, to connect to and be able to view your DB data.
- Once you get the inc_random.asp file to display properly and you can login successfully to the /admin/index.asp file, your in business. All in all, barring any technical issues, this whole process should take no more than 10 minutes.
- Now you have to get the inc_random.asp file to display on your blog, so the only way to accomplish getting information to be displayed cross-domain is with the use of an html iframe as follows (we’ve removed the html open and close brackets so the code won’t get munched by blogger’s server and you’d still be able to copy and paste the code for your own evil doing):
iframe src=”http://www.YOURWEBHOST.com/RandomQ/inc_random.asp” vspace=”0″ marginheight=”0″ marginwidth=”0″ hspace=”0″ frameborder=”0″ height=”40″scrolling=”no” width=”100%”.
Make sure you close your open Iframe tag with a /iframe
Now the fun part – put in your data by logging into the RandomQ admin console and get to steppin!

Which of our quotes do you like the best? Got any ideas?
Damn son!! Let us know in the comments! Why are you all quiet and shit?
Oh and thanks to Mike aka Commodore64 for his assistance on this article and a great find on the application as well as implementation of it.
I don’t know if I am doing you a favor or being an asshole by posting this But, one of our readers Daryl sent this in and I have been absorbed by it over the last few days.
Lets just hope none of my servers were beeping angrily as I was shoot, shoot, shooting away!
Check it out, it’s embedded in this post. If you are in a feed reader you will need to stop by and visit the site! Let me know what your high scores are!
 Click the image to play the game!
If I could start the flash silently I would have left the game but on the home page it is a little too much of a distraction. Anyone know how to do that without editing the flash?
 I can’t give you X-Ray vision. I can’t even explain this picture on the left (Freaky Ain’t It??).
But I do have an answer to seeing through one window to another.
No we are not talking about real life glass windows (that would be stupid wouldn’t it?) – We ARE talking about a Microsoft Window’s, Window.
If you are like us then you are constantly checking documents and switching between windows.
You need to see your data and write your articles in separate windows, Now wouldn’t it be peachy keen if you could see through your browser’s window – even just a little? That way I could have an Word document or an Excel sheet open behind an editor window and just keep on type, type, typing away.


Check it out: Glass2k from Chime Software. The project is dead but the software works and does just what I need it to.It allows me to set transparency for any window and the task bar. Run it and right click on your windows Title bar and choose your transparency in increments of 10%.

From their website:
Q) How to use Glass2k ?
A) Once the program is running and the icon is shown in the system-tray (near the clock), you can press the following key comibations:
- Control + Shift + 9 : Least transparency
- Control + Shift + 8 : A little more transparency
- Control + Shift + . : …
- Control + Shift + . : …
- Control + Shift + 2 : Very high transparency
- Control + Shift + 1 : Maximum transparency
- Control + Shift + 0 : No transparency / Solid
You can also right-click on any window and select the transparency values from the Glass2k Transparency-popup menu.
Q) When will the final version be ready ?
A) We are doing our best to release it by the end of December 2001. 🙂
Cool app and at a price we like – Free. Any one else have another way to make stuff transparent in Windows? [Chime Software]
_TheXrayingAdmiN_

AskTheAdmin has covered third party applications that create similar shortcuts. But we know you guys want to be able to do this stuff from scratch with out no stinking tools. It is simple as pie (pie is actually not that simple, nor is PI). Simply fire up a text editor and type in the following information:
Windows Registry Editor Version 5.00
[[HKEY_CURRENT_USER\Control Panel\Desktop]"ScreenSaveActive"="0"

Your text document should look like the above picture. Save it as something clever like SaverOff.reg. The .reg is the magic that makes this happen. It is interpreted as a registry backup file and by activating it with regedit – it gets imported into your registry making the change instantly for your impatient self!
Don’t close that text file yet. Change the =”0″ to =”1″ and re-save the file as SaverOn.reg – Yes you guessed it that registry entry will turn the ScreenSaver on!
And now creating the shortcuts to enable and disable screensaver is just as easy. All you need to do is create a shortcut by right clicking on your desktop and selecting New — Shortcut. You will get a screen like the one below:
 In the location field simply type in regedit.exe /s “and the location of each of the .reg files you saved before. If it is on your desktop it would look SOMETHING like this for the SaverOff shortcut:
regedit.exe /s “C:\Documents And Settings\User\Desktop\SaverOff.reg
And SOMETHING like this for the SaverOn Shortcut:
regedit.exe /s “C:\Documents And Settings\User\Desktop\SaverOn.reg
Next time you are watching Porn a movie with that special someone A hooker don’t have your Smurfs screen saver kick in and ruin your experience.
 But you have your reservations.
You’ve gotten so accustomed to using MS Office and Open/Star Office just wont make you happy.
You like Adobe Acrobat and have web apps that require Internet Exploiter.
Photoshop…Lotus Notes….Winrar….Flash, Dreamweaver, iTunes, Quicktime, etc…
Nope you can’t use Ubuntu, not with those things.
Just yesterday I stumbled across a product, which I am told has been around for a long time, it’s called CrossOver from Codeweavers.
For $40 you can run just about anything you want on a Linux machine from the Windows world with this version of WINE on Barry Bonds approved steroids. It is drop dead simple to install and put applications on it.
Currently on the Ubuntu box I am running MS Office XP, Acrobat Reader, IE 6 and a couple other apps just for shits and giggles.
Haven’t had too much of a problem getting the applications to install yet, with the exception of a Citrix client.
According to their website there are a lot of Win32 games that are supported as well, so if you’re a gamer it will make the transition to Linux easier to swallow.
Look it up and give it a test drive. It is worth it and might convince you to put Ubuntu on your personal machines knowing you can run much of the important apps you are used to. Let us know in the comments if you like it, hate it or use something else!
I had the pleasure of attempting to migrate a print server this weekend. I mean I had to figure out a quick and efficient way to install the 70 some odd printers on a new server. I was not going to be doing this manually that was for shit sure! I had some junior admins standing by –

I quickly found out that Microsoft provide a tool to back up and restore your printers. Score!
It said it will back up all your printers, settings, and drivers into a .cab archive, and then it allows you to restore the cab file on a different machine.
This small app grabbed ALL my printers including the local ones, copied all their drivers and crap to a single cab file. I was able to run the PrintMig on the new server and import the printers.
In 15 minutes or so all my printers were installed and working properly except one USB guy that needed to have its port switched. All in all it went very well. And I discovered another thing while testing:
So you can copy printers from one machine to another, create cab files for different off domain laptop configurations. Or this is great if you don’t do the Active Directory thing and want to semi-automate printer installation.
The latest version of Printmig is 3.1 and is available for downaload here.

more details available from:
http://www.microsoft.com/printserver
A special thanks goes out to the internet on this one. Thanks for being there for me man!
_TheOfficeSpaceAdmiN_
Take That TimeWarner!
Recently Commodore64 lamented that his ISP, TimeWarner cable had lowered his upload speed to 60k. Well sir, I hope Verizon will be rolling out fiber in your area soon. They were here today to install their FiOS service, and it rocks! As you can see, I am getting significantly faster uploads than TimeWarner provides.

The install was pretty quick and painless (mostly because I did a lot of the hard work ahead of time). The technician ran a molded and pre-cut piece of fiber from the pole to the house. The optical network terminal is mounted inside the house, usually in a basement or garage. He brought the fiber through the outside wall and into our laundry room near the electrical panel.
 There were three separate pieces to mount on our cinder block wall, so he placed them all on a piece of plywood to make it easier. The small boxes at the bottom are the power supply (right) and a battery backup unit (left). The battery provides up to 8 hours of phone service during a power failure. He said it powered the phone only, but a simple test showed that it powered the Internet service also. Of course you would need to have your computer and the router on a UPS to maintain your connectivity, but it is technically possible.
The large box at the top contains a lower panel where he coiled the excess fiber. The upper panel is really the heart of the unit. There is a place to plug in the fiber, 4 spaces for phone lines, an Ethernet port for data and a coax port for the TV service.
 On the right there are the four spaces for tradition POTS phone lines. The FiOS service is true POTS, not VOIP. That is a piece of Cat 5 running to the old phone NID which some rocket scientist decided to put in our attic. From there it feeds all the house phones. Next to that is an Ethernet port where he plugged in the Cat 6 which I had previously run to where the router was going to be. I decided to run the internal cables myself because the locations were a little complex and I was particular about how their install would look. Utilities tend to take the easiest, cheapest option that technically gets the job done, not necessarily the best looking one for the homeowner. The technician was very happy to use my wiring since it saved him A LOT of time and effort.
On the far right is a coax port for the TV service (which I didn’t get at this time). If you already have cable TV service they can use the existing wiring and simply connect it to that port.
After that was all done, it was just a matter of disconnecting our copper phone line and configuring the router. They provided a relatively powerful 4-port wireless G router. It has a lot more options that a typical consumer router including per-port blocking and parental controls, a firewall with an almost endless array of options, and full traffic and bandwidth monitoring.
One very odd thing is that the default wireless encryption is WEP. Get with the program Verizon, WEP has been cracked for years! Defaulting to WEP gives people a false sense of security. In their defense I will point out that the router does support WPA and WPA2, but I can guarantee you that the average user is never going to be able to figure out how to change it to use them. It is buried pretty deep in the interface.
I opened Firefox and you can see the results of the speedtest above. I downloaded a 200 Meg file from Microsoft.com in 5 minutes. With a connection this fast you do start to realize the limitations of other connections. I uploaded a file to our FTP server at the office and I was able to completely saturate our T1 (can you say DOS attack?)
The pricing for a 5/2 FiOS connection is the same as what I was paying for Verizon’s 3.0/768 DSL service. They offer a 15/2 service which you need to get if you want their TV service.
Overall, I’m very happy with it. The FiOS service is noticeably faster (especially uploads) then the DSL service. More speed for the same price, can’t go wrong there. Plus I get geek bragging rights and can say I’m one of the first people in the area to get it.
 John from Staten Island wrote in to us asking if he had to purchase the full version of Vista for the new PC he just built or could he
 Hack “Finese” the upgrade version into installing?
Obviously money is the deciding factor in what OS the machine will ultimately hold so John was VERY happy when we showed him this “Work-A-Round”. This one is for you John! 🙂
If any of you went out and copped the newest version of Windows, the oh so loved, Windows Vista – you might have very well over paid.
But for anyone who is contemplating grabbing Vista Not From Pirates Bay!! from a legit retail source, It seems that this little trick of the trade can help you save over $100 on a legal purchase of the full version of Vista. I can think of LOTS of things I would rather spend my money on!
Can’t you?

So if you are not upgrading an older version of Windows like XP or 2000 pro you would Technically have to purchase a FULL version of Vista instead of an UPGRADE version and as you can see below there are big differences in the prices:
| Edition | Full version | Upgrade version
|
| Vista Home Basic | $192 | $100 ($92 less) |
| Vista Home Premium | $228 | $156 ($72 less) |
| Vista Business | $285 | $192 ($93 less) |
| Vista Ultimate | $380 | $225 ($155 less) |
Everyone thought this was just crappy programing a bug and figured it would have been fixed Phased out in SP1. But SURPRISE SURPRISE! It’s still there and this leads AtA to believe that the boys in Redmond want it to be there.
Use Vista’s ‘upgrade’ version to clean-install
The secret is that the setup program in Vista’s upgrade version will accept an installed copy of XP, W2K, or an unactivated copy of Vista itself as evidence of a previous installation.This enables you to “clean install” an upgrade version of Vista to any formatted or unformatted hard drive, which is usually the preferred method when installing any new operating system. You must, in essence, install Vista twice to take advantage of this trick. But Vista installs much faster than XP, so it’s quicker than installing XP followed by Vista to get the upgrade price.
Before you install Vista on a machine that you don’t know is 100% compatible, you should run Microsoft’s free Upgrade Advisor. This program — which operates only on 32-bit versions of XP and Vista (plus Vista Enterprise) — reports to you on any hardware or software it finds that may be incompatible with Vista. See Microsoft’s Upgrade Advisor page.
Also, to see which flavors of XP Home, XP Pro, and 2000 officially support in-place installs and clean installs of the different Vista editions, see Microsoft’s upgrade paths page.
Here’s a simplified overview of the steps that are required to clean-install the upgrade version of Vista:
Step 1. Boot the PC from the Vista DVD.
Step 2. Select “Install Now,” but do not enter the Product Key from the Vista packaging. Leave the input box blank. Also, turn off the option Automatically activate Windows when I’m online. In the next dialog box that appears, confirm that you really do want to install Vista without entering a Product Key.
Step 3. Correctly indicate the version of Vista that you’re installing: Home Basic, Home Premium, Business, or Ultimate.
Step 4. Select the “Custom (Advanced)” install, not the “Upgrade” install.
Step 5. Vista copies files at length and reboots itself one or more times. Wait for the install to complete. At this point, you might think that you could “activate” Vista, but you can’t. That’s because you haven’t installed the Vista upgrade yet. To do that, run the DVD’s setup.exe program again, but this time from the Vista desktop. The easiest way to start setup again is to eject and then reinsert the DVD.
Step 6. Click “Install Now.” Select Do not get the latest updates for installation. (You can check for these updates later.)
Step 7. This time, do enter the Product Key from the Vista packaging. Once again, turn off the option Automatically activate Windows when I’m online.
Step 8. On this second install, make sure to select “Upgrade,” not “Custom (Advanced).” You’re not doing a clean install now, you’re upgrading to Vista.
Step 9. Wait while Vista copies files and reboots itself. No user interaction is required. Do not boot from the DVD when asked if you’d like to do so. Instead, wait a few seconds and the setup process will continue on its way. Some DOS-like, character-mode menus will appear, but don’t interact with them. After a few seconds, the correct choice will run for you automatically.
Step 10. After you click a button labeled Start in the Thank You dialog box, Vista’s login screen will eventually appear. Enter the username and password that you selected during the first install. You’re done upgrading to Vista.
Step 11. Within 30 days, you must “activate” your copy of Vista or it’ll lose functionality. To activate Vista, click Show more details in the Welcome Center that automatically displays upon each boot-up, then click Activate Windows now. If you’ve dismissed the Welcome Center, access the correct dialog box by clicking Start, Control Panel, System & Maintenance, System. If you purchased a legitimate copy of Vista, it should quickly activate over the Internet. (You can instead activate by calling Microsoft on the phone, which avoids your PC exchanging information with Microsoft’s server.)
I’m not going into detail today on the merits of buying Vista at retail instead of buying a cheaper OEM copy. (The OEM offerings don’t entitle you to call Microsoft for support, while the retail packages do.) Also, I’m not touching here on the least-expensive way to buy Vista, which is to take advantage of Microsoft’s “educational” rate. I’ll describe both of these topics in next week’s newsletter.
I think this is just a marketing ploy by good old M$ – giving the guys with a little technical know how a discount (these are the guys that favor Linux and pretty much anything besides Windows). So this might just be a great idea from the board table that is M$. Either which way it saves you dough so… Thanks WindowsSecrets!
Did you know about this?

Be fore-warned, head my warning, listen well young reader… .. insert any other corny sounding warnings you can think up here…
This will consume your free time. It is worse than Snood or the Image labeler from Google.
Your favorite Plumber turned strange creature hunter, princess rescuer and now some kind of strange floating bubble spewing guy is BACK!
And now he is in a SUPER small game for your PC that requires NO INSTALLATION! It is pretty neat and has sucked in a lot of bit of my precious time away! Check out these screen shots and then go get your mario on over here – it’s a free download. Thanks OrangeInks


Anyone else have some good free online games that they are into? Share em’ with us in the comments – DON’T BE A DEADBEAT! Sharing is caring 🙂
Flickr Photos


Recent Comments
